WeAct Studio STM32H743
This page discusses issues unique to NuttX configurations for the WeAct STM32H743 board.
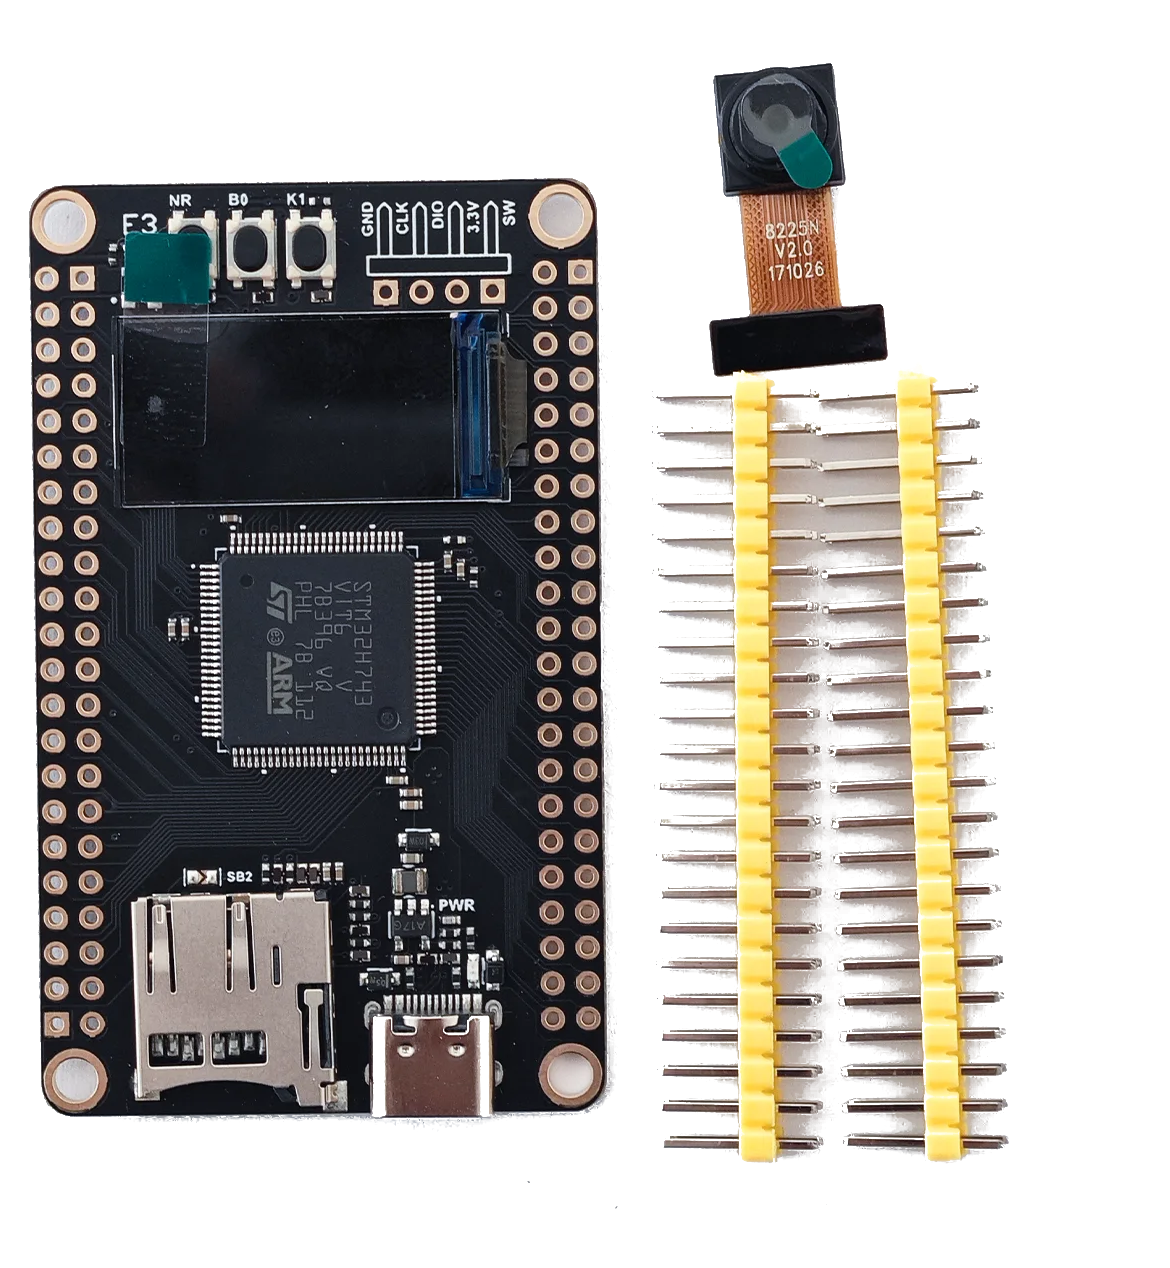
Board information
This board was release by WeAct Studio in 2020 and developed based on STM32H743VI microcontroller.
- The board features:
USB-C power supply
SWD connector
Crystal for HS 25MHz
Crystal for RTC 32.768KHz
1 user LED
1 MicroSD connector supporting 1 or 4-bit bus
1 USB 2.0 Host/Device
2 SPI Flash
1 OLED display
1 Camera
Board documentation: https://github.com/WeActStudio/MiniSTM32H7xx
BOARD-LED
The WeAct STM32H743 has 1 software controllable LED.
LED
PINS
E3
PE3
UART/USART
The WeAct STM32H743 used the USART1 for serial debug messages.
USART1
USART1
PINS
TX
PB14
RX
PB15
SDMMC
The WeAct STM32H743 has one SDCard slot connected as below:
SDMMC1
PINS
SDMMC_D0
PC8
SDMMC_D1
PC9
SDMMC_D2
PC10
SDMMC_D3
PC11
SDMMC_DK
PC12
GPIO
PINS
SDCARD_DETECTED
PD4
Each weact-stm32h743 configuration is maintained in a sub-directory and can be selected as follow:
./tools/configure.sh weact-stm32h743:<subdir>
Where <subdir> is one of the following:
Flashing
This board can be flashed/programmed via DFU or SWD. The DFU is an alternative when you don’t have a SWD programmer, but SWD offer more than flashing: you can use it for code debugging with GDB. So it is recommended that you have a SWD tool on your workbench.
DFU
First put the board in DFU mode: press and hold Boot0 (B0) button and click and release the reset (NR) button with the board powered over USB cable. Other alternative is just removing the USB cable, then press and hold the B0 button and connect the USB while still holding that button.
You can confirm the board is in DFU mode using dmesg:
$ sudo dmesg
[ 1219.182108] usb 3-5: New USB device found, idVendor=0483, idProduct=df11, bcdDevice= 2.00
[ 1219.182120] usb 3-5: New USB device strings: Mfr=1, Product=2, SerialNumber=3
[ 1219.182122] usb 3-5: Product: DFU in FS Mode
[ 1219.182124] usb 3-5: Manufacturer: STMicroelectronics
[ 1219.182125] usb 3-5: SerialNumber: 200000500000
You need to have dfu-util installed in your computer:
$ sudo apt install dfu-util
Now list the DFU unities:
$ sudo dfu-util -l
dfu-util 0.11
Copyright 2005-2009 Weston Schmidt, Harald Welte and OpenMoko Inc.
Copyright 2010-2021 Tormod Volden and Stefan Schmidt
This program is Free Software and has ABSOLUTELY NO WARRANTY
Please report bugs to http://sourceforge.net/p/dfu-util/tickets/
Found DFU: [0483:df11] ver=0200, devnum=5, cfg=1, intf=0, path="3-5", alt=1, name="@Option Bytes   /0x5200201C/01*128 e", serial="200000500000"
Found DFU: [0483:df11] ver=0200, devnum=5, cfg=1, intf=0, path="3-5", alt=0, name="@Internal Flash   /0x08000000/16*128Kg", serial="200000500000"
Finally flash the compiled nuttx.bin:
$ sudo dfu-util -d 0483:df11 -a 0 -s 0x08000000:leave -D nuttx.bin
dfu-util: Warning: Invalid DFU suffix signature
dfu-util: A valid DFU suffix will be required in a future dfu-util release
Opening DFU capable USB device...
Device ID 0483:df11
Device DFU version 011a
Claiming USB DFU Interface...
Setting Alternate Interface #0 ...
Determining device status...
DFU state(2) = dfuIDLE, status(0) = No error condition is present
DFU mode device DFU version 011a
Device returned transfer size 1024
DfuSe interface name: "Internal Flash   "
Downloading element to address = 0x08000000, size = 141324
Erase      [=========================] 100%       141324 bytes
Erase    done.
Download   [=========================] 100%       141324 bytes
Download done.
File downloaded successfully
Submitting leave request...
dfu-util: Error during download get_status
You can ignore that get_status error and restart the board to get nsh> working over serial or USB (depending on selected config: nsh or usbnsh).
SWD
Another option to flash/program your board is via SWD interface. In this case you will need a SWD programmer compatible with OpenOCD like STLink-V2 or other.
Install openocd on your computer:
$ sudo apt install openocd
Connect the SWD wires from STLink-V2 (or other programmer) this way:
SWD Programmer |
Weact-STM32H743 |
|---|---|
SWDIO |
DIO |
GND |
GND |
SWCLK |
CLK |
Then run this command in the same directory where your nuttx.bin is located:
$ openocd -f interface/stlink.cfg -f target/stm32h7x.cfg -c "init" -c "reset halt" -c "flash write_image erase nuttx.bin 0x08000000" -c "reset run"
Open On-Chip Debugger 0.11.0+dev-gcf314db1f-dirty (2025-05-17-16:09)
Licensed under GNU GPL v2
Info : 49 4 adapter.c:111 adapter_init(): clock speed 1800 kHz
Info : 67 7 stlink_usb.c:1438 stlink_usb_version(): STLINK V2J17S4 (API v2) VID:PID 0483:3748
Info : 69 8 stlink_usb.c:1474 stlink_usb_check_voltage(): Target voltage: 3.268800
Info : 82 112 cortex_m.c:2325 cortex_m_examine(): [stm32h7x.cpu0] Cortex-M7 r1p1 processor detected
Info : 127 120 cortex_m.c:2440 cortex_m_examine(): [stm32h7x.cpu0] target has 8 breakpoints, 4 watchpoints
User : 128 120 target.c:777 target_examine_one(): [stm32h7x.cpu0] Target successfully examined.
Info : 193 165 gdb_server.c:4825 gdb_target_start(): starting gdb server for stm32h7x.cpu0 on 3333
Info : 194 165 server.c:359 add_service(): Listening on port 3333 for gdb connections
The core #0 listens on 3333.
ICEman is ready to use.
User : 259 196 armv7m.c:740 armv7m_arch_state(): target halted due to debug-request, current mode: Thread
xPSR: 0x01000000 pc: 0x080013bc msp: 0x24001e28
Info : 266 197 stm32h7x.c:791 stm32x_probe(): Device: STM32H74x/75x
Info : 270 197 stm32h7x.c:819 stm32x_probe(): flash size probed value 2048k
Info : 271 197 stm32h7x.c:849 stm32x_probe(): STM32H7 flash has dual banks
Info : 272 197 stm32h7x.c:869 stm32x_probe(): Bank (0) size is 1024 kb, base address is 0x08000000
Info : 273 197 core.c:876 flash_write_unlock_verify(): Padding image section 0 at 0x0802280c with 20 bytes (bank write end alignment)
Warn : 275 198 core.c:552 flash_iterate_address_range_inner(): Adding extra erase range, 0x08022820 .. 0x0803ffff
User : 2674 4879 options.c:63 configuration_output_handler(): auto erase enabled
wrote 141344 bytes from file nuttx.bin in 4.682974s (29.475 KiB/s)
User : 2675 4879 options.c:63 configuration_output_handler():
Info : 2714 4889 server.c:359 add_service(): Listening on port 6666 for tcl connections
Info : 2715 4889 server.c:359 add_service(): Listening on port 4444 for telnet connections
After you got the message “wrote xxxxxx bytes from file nuttx.bin” you can press Ctrl+C (^C) to finish the application. Now you can reset the board and get access to the NSH terminal.
Configuration Directories
nsh
Configures the NuttShell (nsh) located at apps/examples/nsh. This configuration enables a serial console on UART1.
usbnsh
Configures the NuttShell (nsh) located at apps/examples/nsh. This configuration enables a serial console over USB.
After flashing and reboot your board you should see in your dmesg logs:
[ 2638.948089] usb 1-1.4: new full-speed USB device number 16 using xhci_hcd
[ 2639.054432] usb 1-1.4: New USB device found, idVendor=0525, idProduct=a4a7, bcdDevice= 1.01
[ 2639.054437] usb 1-1.4: New USB device strings: Mfr=1, Product=2, SerialNumber=3
[ 2639.054438] usb 1-1.4: Product: CDC/ACM Serial
[ 2639.054440] usb 1-1.4: Manufacturer: NuttX
[ 2639.054441] usb 1-1.4: SerialNumber: 0
[ 2639.074861] cdc_acm 1-1.4:1.0: ttyACM0: USB ACM device
[ 2639.074886] usbcore: registered new interface driver cdc_acm
[ 2639.074887] cdc_acm: USB Abstract Control Model driver for USB modems and ISDN adapters
You may need to press ENTER 3 times before the NSH show up.
sdcard
Configures the NuttShell (nsh) and enables SD card support. The board has an onboard microSD slot that should be automatically registered as the block device /dev/mmcsd0 when an SD card is present.
The SD card can then be mounted by the NSH commands:
nsh> mount -t vfat /dev/mmcsd0 /mnt
nsh> mount
nsh> echo "Hello World!!" > /mnt/test_file.txt
nhs> ls /mnt/
test_file.txt
nsh> cat /mnt/test_file.txt
Hello World!!
st7735
This config enables the ST7735 0.96” Display (80*160) on weact-stm32h743 board:
nsh> fb
VideoInfo:
      fmt: 11
     xres: 80
     yres: 160
  nplanes: 1
PlaneInfo (plane 0):
    fbmem: 0x38000d50
    fblen: 25600
   stride: 160
  display: 0
      bpp: 16
Mapped FB: 0x38000d50
 0: (  0,  0) ( 80,160)
 1: (  7, 14) ( 66,132)
 2: ( 14, 28) ( 52,104)
 3: ( 21, 42) ( 38, 76)
 4: ( 28, 56) ( 24, 48)
 5: ( 35, 70) ( 10, 20)
Test finished
nsh>
halow
This config enables a Wi-Fi HaLow (IEEE 802.11ah) network interface using a Morse Micro MM6108 based module (tested with the Seeed Studio XIAO Wi-Fi HaLow module, Quectel FGH100M-H) connected to SPI1. See Morse Micro Wi-Fi HaLow (IEEE 802.11ah) for the driver documentation.
The module is wired as below:
Module |
WeAct H743 |
Notes |
|---|---|---|
5V |
5V |
RF power amplifier, required to transmit |
3V3 |
3V3 |
Module digital logic |
GND |
GND |
Keep a ground wire next to the SPI wires |
D8 (SCK) |
PA5 |
SPI1_SCK |
D9 (MISO) |
PA6 |
SPI1_MISO |
D10 (MOSI) |
PA7 |
SPI1_MOSI |
D3 (CS) |
PA4 |
GPIO chip select |
D2 (IRQ) |
PA1 |
EXTI1, active low |
D0 (RESET_N) |
PA2 |
GPIO, held low until the driver boots the chip |
D1 (WAKE) |
PA3 |
Optional, see below |
D4 (BUSY) |
PA0 |
Optional, EXTI0, see below |
SCK and MOSI use the lowest GPIO slew rate: with jumper wires the ringing of faster edges double clocks the module SPI interface. The SPI clock is 20 MHz (18.75 MHz actual).
On the Seeed Studio XIAO HaLow module the WAKE (D1) and BUSY (D4) pads are
not connected to the FGH100M-H: the series resistors are not populated
(DNP). Without BUSY the chip cannot wake up the host from power save, so by
default the board does not declare these lines and the driver keeps the
chip always awake. If the two resistors are populated, enable
CONFIG_WEACT_STM32H743_HALOW_POWERSAVE to use the power save.
The build downloads the needed files of the Morse Micro MM-IoT-SDK (about
3 MB: the pre-built libmorse host library and the chip firmware, under
the Morse Micro Binary Distribution License) and the FGH100M-H board
configuration file (BCF), which is converted with python3 and
pyelftools. The STM32H7 RNG (clocked by HSI48) provides the entropy
needed by WPA3-SAE.
The image is bigger than 1 MiB, so both flash banks must be programmed,
e.g. with OpenOCD:
$ openocd -f interface/stlink.cfg -c "set DUAL_BANK 1" \
    -f target/stm32h7x.cfg -c "program nuttx.bin 0x08000000 verify reset exit"
Wi-Fi HaLow only supports open, OWE and WPA3-SAE networks. Connect to a WPA3-SAE access point and get an address with DHCP:
nsh> ifconfig wlan0 up
nsh> wapi scan wlan0
bssid / frequency / signal level / encode / ssid
1c:bc:ec:30:f7:fb   9.035e+08       -14     0800    silex-ap
nsh> wapi psk wlan0 mypassphrase 3 3
nsh> wapi essid wlan0 silex-ap 1
nsh> renew wlan0
nsh> ifconfig
wlan0       Link encap:Ethernet HWaddr 68:24:99:44:6b:6b at RUNNING mtu 1500
    inet addr:10.0.3.245 DRaddr:10.0.0.1 Mask:255.255.240.0
nsh> ping -c 3 10.0.0.1
The default regulatory domain is US (CONFIG_IEEE80211_MORSE_COUNTRY). It
can be changed while disconnected with wapi country wlan0 AU.