RZV2H-RDK

Tags: arch:arm arch:armv7-r arch:cortex-r8 chip:rzv2h vendor:renesas

The RZV2H-RDK is a development board for the Renesas RZ/V2H (R9A09G057) MPU. NuttX is ported to run on one of the two Cortex-R8 real-time cores (CR8_0).

Board Overview
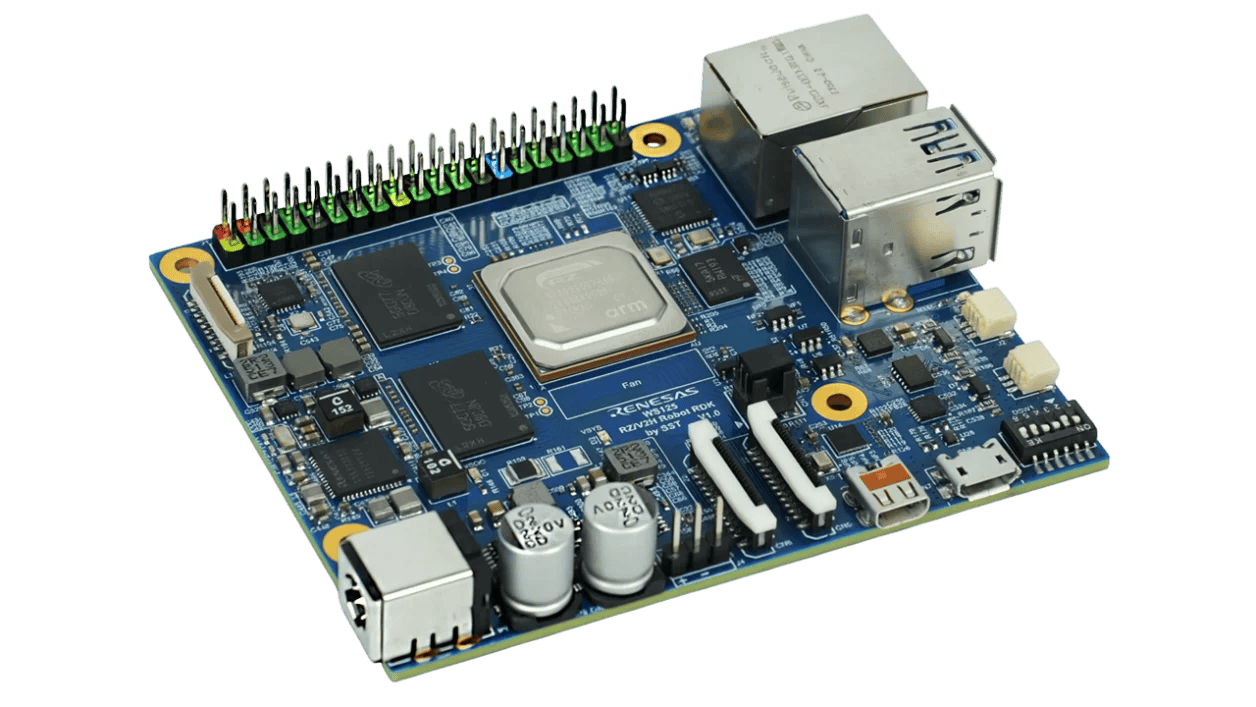
../../../../../_images/rzv2h-rdk-overview.png

See the RZ/V2H product page for information about the RZ/V2H MPU.

Board Set-up
../../../../../_images/rzv2h-rdk-board-set-up.png

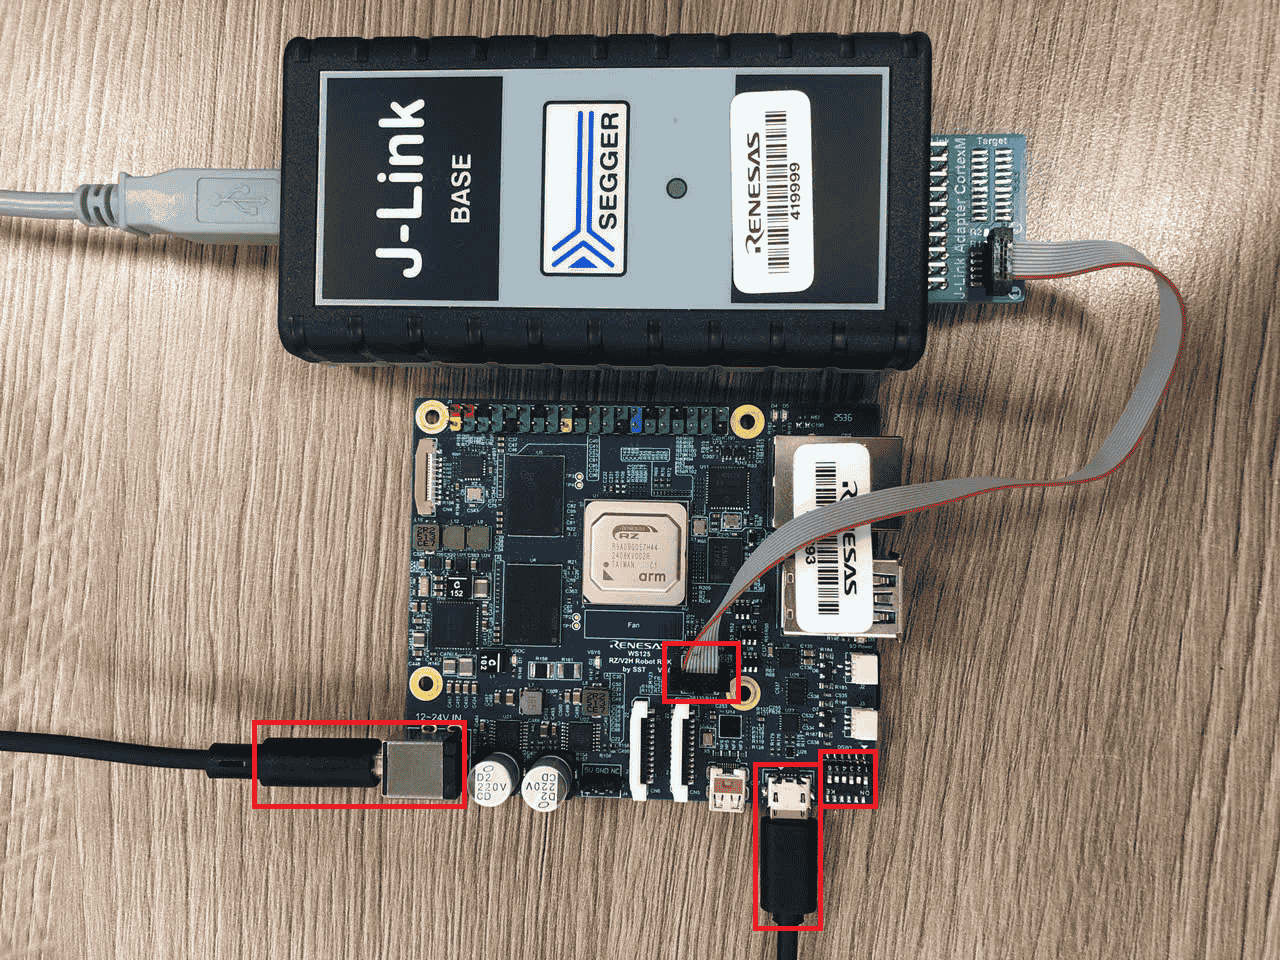
The following steps set up the board to debug/run NuttX over SWD with a J-Link debugger:

  1. Configure the SWD interface to use the J-Link debugger via the DIP switches (highlighted in red in the picture above):

    DSW1

    Set

    1-1

    ON

    1-2

    OFF

    1-3

    ON

    1-4

    OFF

    1-5

    OFF

    1-6

    ON

  2. Connect the J-Link debugger to the board’s CN1 debug connector.

  3. Plug the CN8 serial port (to check the correct IPL).

4. Connect power to the board to P1 connector. The RDK board is powered by external 12 to 24V DC. It is recommended to use the 12V/2A power adapter included in the box.

To power off the board, disconnect the J-Link debugger first, then remove power.

Getting the HAL Renesas

Clock bring-up (see below) is implemented on top of Renesas’ vendored FSP BSP code, which ships in a separate hal_renesas repository and is not part of the nuttx git tree.

make context (run automatically as part of a normal build) clones the repository at the pinned version into arch/arm/src/common/renesas/hal_renesas, as defined in arch/arm/src/common/renesas/Make.defs. Nothing needs to be cloned manually. make distclean removes it.

HAL_RENESAS_URL and HAL_RENESAS_VERSION can be set in the environment to use another repository or revision, for example a local checkout:

HAL_RENESAS_URL=/path/to/hal_renesas make

Buttons and LEDs

Buttons

The RZ/V2H-RDK has one active-high button on P10_0 exposed through the generic NuttX GPIO interface as /dev/gpio0.

Hardware connection

Connect a normally-open momentary switch between P10_0 and the board’s 3.3-V logic supply, with a common ground between the board and the external circuit. The board configures P10_0 as an input with its internal pull-down enabled:

  • button released: the pull-down drives the input low; /dev/gpio0 reads 0;

  • button pressed: the switch drives the input high; /dev/gpio0 reads 1.

The pin definition is BOARD_P10_0_BUTTON in boards/arm/rzv2h/rzv2h-rdk/include/board.h. It selects BSP_IO_PORT_10_PIN_00 with input, input-buffer, and pull-down settings.

Warning

P10_0 is a multiplexed pin. Confirm the RDK schematic and make sure that no enabled peripheral claims this pin before connecting the button.

Configuration and registration

Use a configuration that enables the generic GPIO test path, for example rzv2h-rdk:nsh-leds. The required options are:

CONFIG_DEV_GPIO=y
CONFIG_RZV2H_GPIO=y
CONFIG_EXAMPLES_GPIO=y
CONFIG_BOARD_LATE_INITIALIZE=y

During board_late_initialize(), rzv2h_bringup() calls rzv2h_gpio_initialize(). This registers the button input first as /dev/gpio0 and configures the input through the Renesas FSP IOPORT driver.

NSH usage example

After booting NuttX, first verify that the device was registered:

nsh> ls /dev
nsh> gpio /dev/gpio0
Driver: /dev/gpio0
  Input pin:     Value=0

Press and hold the button, then run the read command again:

nsh> gpio /dev/gpio0
Driver: /dev/gpio0
  Input pin:     Value=1

Release the button and repeat the command; the value must return to 0.

Current limitations

The current GPIO implementation supports synchronous read and write only. GPIO interrupt attachment and enablement are placeholders, so gpio -w cannot report button transitions. Runtime pin-type changes are also not implemented, so do not use gpio -t. The board does not debounce the external switch; use a polling application with software debounce if continuous monitoring is required.

LEDs

Two active-low GPIO outputs are available for LED testing. They are registered after the button input, giving the following device mapping:

Pin

GPIO device

Function

P11_4

/dev/gpio1

LED output 1

P11_5

/dev/gpio2

LED output 2

Using the NSH GPIO application

The nsh configuration enables CONFIG_DEV_GPIO and CONFIG_EXAMPLES_GPIO. The gpio example is reused from the standard NuttX application repository at apps/examples/gpio; it is not an RZ/V2H-specific application. The RZ/V2H board port only configures the pins, registers /dev/gpio0 through /dev/gpio2, and enables the example in the board configuration.

For these LED outputs, only -o and the device path are needed. The -o option writes the logical pin level (zero or one), while the device path selects the LED. Because the LEDs are active low, write zero to turn an LED on and one to turn it off. For example:

nsh> gpio -o 0 /dev/gpio1
nsh> gpio -o 1 /dev/gpio1
nsh> gpio -o 0 /dev/gpio2
nsh> gpio -o 1 /dev/gpio2

Using the NuttX user-LED application

The nsh-leds configuration also enables the standard NuttX user-LED interface and example with these options:

# CONFIG_ARCH_LEDS is not set
CONFIG_USERLED=y
CONFIG_USERLED_LOWER=y
CONFIG_EXAMPLES_LEDS=y
CONFIG_BOARD_LATE_INITIALIZE=y

During late initialization, the board registers /dev/userleds. The board_userled_*() callbacks configure P11_4 and P11_5, convert the logical LED state to the active-low pin level, and support LED mask bits 0x01 and 0x02.

Run the unmodified NuttX example from apps/examples/leds to cycle the two LED outputs:

nsh> ls /dev
nsh> leds

The device list should contain userleds, and the example should report a supported LED mask of 0x03.

Serial Consoles

The default nsh configuration uses SCI channel 0 as the serial console at 115200 baud, 8 data bits, no parity, and one stop bit. The board pin definitions route SCI0 as follows:

Signal

Pin

Board definition

J1 header

TXD0

P5_0

BOARD_SCI0_TXD_GPIO

J1 pin 36

RXD0

P5_1

BOARD_SCI0_RXD_GPIO

J1 pin 22

Connect a 3.3 V TTL UART adapter to the J1 header pins listed above. Cross the data lines so that J1 TXD0 connects to the adapter RX and J1 RXD0 connects to the adapter TX. Hardware flow control is not enabled. Use a 3.3 V TTL UART adapter, not an RS-232 adapter.

The relevant default options are:

CONFIG_RZV2H_UART_SCI=y
CONFIG_RZV2H_SCI_B_UART0=y
CONFIG_SCI0_SERIAL_CONSOLE=y
CONFIG_SCI0_BAUD=115200
CONFIG_SCI0_BITS=8
CONFIG_SCI0_PARITY=0
CONFIG_SCI0_2STOP=0

After boot, SCI0 is available as both /dev/console and /dev/ttyS0. The terminal should display the NuttX banner followed by the nsh> prompt. Verify the registration with:

nsh> ls /dev
/dev:
 console
 null
 ttyS0
 zero

Additional enabled SCI channels are registered as later /dev/ttyS* devices in ascending hardware-channel order. Their TX and RX pin choices are board-specific and are defined by BOARD_SCIn_TXD_GPIO and BOARD_SCIn_RXD_GPIO in boards/arm/rzv2h/rzv2h-rdk/include/board.h.

Configurations

nsh

NuttShell configuration exercising clock, MPU, interrupt/timer, GPIO, and SCI-B UART bring-up on CR8_0. SCI0 provides the default 115200-8N1 NSH console through J1 pin 22 (RXD0) and J1 pin 36 (TXD0) and is registered as /dev/console and /dev/ttyS0.

nsh-leds

This configuration enables CONFIG_USERLED, registers /dev/userleds, and includes the standard NuttX leds example. Run leds to cycle the active-low P11_4 and P11_5 LED outputs. The generic /dev/gpio0, /dev/gpio1, and /dev/gpio2 interfaces are also available for individual read/write testing.