ELF Programs – With Symbol Tables
You can easily extend the firmware in your released, embedded system using ELF programs provided via a file system. For example, an SD card or, perhaps, downloaded into on-board SPI FLASH.
In order to support such post-release updates, your released firmware must support execution of ELF programs loaded into RAM and symbol tables also provided via the file system (see apps/examples/elf).
Creating a Symbol Table
There are several ways to create an application symbol table. Only two are compatible with the example provided here:
Board-specific Bring-up Logic Build a symbol table into the base firmware and add it to your board-specific bring-up logic. This technique is typically used in kernel mode with
CONFIG_USER_INITPATH=y.In this setup, the system does not initialize using a standard C call like
nsh_main(). Instead, it starts with aninitELF program, similar to how Linux initializes. The configuration optionCONFIG_EXECFUNCS_SYMTAB_ARRAYinitializes the system with a minimal set of symbols required by theinitprogram. Once initialized, theinitprogram would typically callboardctl()to put the final symbol table in place.To enable this method, you must:
Set
CONFIG_EXECFUNCS_HAVE_SYMTAB=yin your configuration.Provide a symbol table with the global name
CONFIG_EXECFUNCS_SYMTAB_ARRAYwith the variable nameCONFIG_EXECFUNCS_NSYMBOLS_VARthat holds the number of symbol entries. The default symbol table name isg_symtaband its length isg_nsymbols.
In this example, let’s illustrate this using an STM32F4-Discovery configuration. We will assume that you have modified the
boards/arm/stm32f4/stm32f4discovery/src/stm32_bringup.cfile, adding the following:#include <nuttx/compiler.h> #include <nuttx/symtab.h> const struct symtab_s g_symtab[] = { { "printf", (FAR const void *)printf } }; int g_nsymbols = 1;
This is a simple symbol table containing only the symbol string “printf”, whose value is the address of the function
printf().This example keeps things simple in order to focus on the core functionality, but there is, of course, a lot more that could be said about generating symbol tables. NuttX provides specialized tools in the
tools/directory for generating more extensive symbol tables: you can start by taking a look attools/mksymtab.c. An example invocation of that tool could be:./tools/mksymtab -d ./libs/libc/libc.csv <path_to_generated_symtab.c>.Application Logic Alternatively, the symbol table can be provided dynamically by the application itself, using the
boardctl()system interface. The specificboardctl()command to use isBOARDIOC_APP_SYMTAB. This command provides the symbol table in the same way as the board-specific logic but allows for application-level control.To use this approach, you need to: - Enable the configurations
CONFIG_BOARDCTL=yandCONFIG_BOARDCTL_APP_SYMTAB=y. - Include application logic to provide the symbol table. IfCONFIG_EXAMPLES_NSH_SYMTAB=yis set, NSH can handle this automatically.
Creating the Export Package
At the time of firmware release, you should create and save an export package. This export package contains all the necessary files required to create post-release add-on modules for your embedded system.
For demonstration purposes, we’ll use the STM32F4-Discovery with the network NSH configuration. This setup assumes that you have the STM32F4DIS-BB baseboard. The demonstration also requires support for externally modifiable media, such as:
Removable media, like an SD card or USB flash drive.
An internal file system remotely accessible via USB MSC, FTP, or other protocols.
A remote file system, such as NFS.
In this demonstration, the networking NSH configuration uses the SD card on the STM32 baseboard. Other NSH configurations can also be used, provided they supply the necessary file system support.
Tip
No baseboard? You can add file system support to the basic STM32F4-Discovery board by following these instructions: USB FLASH drive or SD card.
Initialize the environment:
$ make distclean
$ tools/configure.sh -c stm32f4discovery:netnsh
$ make menuconfig
Edit the configuration:
Disable networking (it is not needed in this example):
# CONFIG_NET is not set.Enable ELF binary support with external symbol tables:
CONFIG_ELF=y,CONFIG_LIBC_EXECFUNCS=y,CONFIG_EXECFUNCS_HAVE_SYMTAB=y,CONFIG_EXECFUNCS_SYMTAB_ARRAY="g_symtab",CONFIG_EXECFUNCS_NSYMBOLS_VAR="g_nsymbols".Enable PATH variable support:
CONFIG_LIBC_ENVPATH=y,CONFIG_PATH_INITIAL="/addons",# CONFIG_DISABLE_ENVIRON not set.Enable execution of ELF files from NSH:
CONFIG_NSH_FILE_APPS=y.
Then, build the NuttX firmware image and the export package:
$ make
$ make export
When make export completes, you will find a ZIP package in the top-level
NuttX directory called nuttx-export-x.y.zip (where x.y corresponds to
the version determined by the .version file in the same directory).
The contents of this ZIP file are organized as follows:
nuttx-export-x.x
|- arch/
|- include/
|- libs/
|- registry/
|- scripts/
|- startup/
|- tools/
|- System.map
`- .config
Preparing the Add-On Build Directory
In order to create the add-on ELF program, you will need:
The export package.
A Makefile to build the program.
A linker script to use in the Makefile.
The example Makefile shown below assumes the use of a GNU toolchain. Note that non-GNU toolchains would likely require a significantly different Makefile and linker script.
Hello Example
To keep things manageable, let’s use a concrete example. Suppose the ELF
program that we wish to add to the release code is the simple
source file hello.c:
#include <stdio.h>

int main(int argc, char **argv)
{
  printf("Hello from a partially linked Add-On Program!\n");
  return 0;
}
Let’s say that we have a directory called addon that contains
the following:
The
hello.csource file.A Makefile to build the ELF program.
The export package
nuttx-export-x.y.zip.
Building the ELF Program
The first step in creating the ELF program is to unzip the export
package. Starting in the addon directory:
$ cd addon
$ ls
hello.c Makefile nuttx-export-x.y.zip
Where:
- hello.c is the example source file.
- Makefile builds the ELF program.
- nuttx-export-x.y.zip is the export package from NuttX version x.y.
Unzip the export package and rename the folder for ease of use:
$ unzip nuttx-export-x.y.zip
$ mv nuttx-export-x.y nuttx-export
This creates a new directory called nuttx-export, containing
all the content from the released NuttX code required to build
the ELF program.
The Makefile
To build the ELF program, simply run:
$ make
This uses the following Makefile to generate several files:
hello.o: The compiled object file forhello.c.hello: The partially linked ELF program.
The Makefile used to create the ELF program is as follows:
Note
When copying the following contents, remember that Makefile indentations must be made with proper tab characters and not just spaces.
include nuttx-export/scripts/Make.defs

# Long calls are needed to call from RAM into FLASH

ARCHCFLAGS += -mlong-calls

# You may want to check these options against the ones in "nuttx-export/scripts/Make.defs"

ARCHWARNINGS = -Wall -Wstrict-prototypes -Wshadow -Wundef
ARCHOPTIMIZATION = -Os -fno-strict-aliasing -fno-strength-reduce -fomit-frame-pointer
ARCHINCLUDES = -I. -isystem nuttx-export/include

CFLAGS = $(ARCHCFLAGS) $(ARCHWARNINGS) $(ARCHOPTIMIZATION) $(ARCHCPUFLAGS) $(ARCHINCLUDES) $(ARCHDEFINES) $(EXTRADEFINES)

# Setup up linker command line options

LDELFFLAGS = --relocatable -e main
LDELFFLAGS += -T nuttx-export/scripts/gnu-elf.ld

# This is the generated ELF program

BIN = hello

# These are the sources files that we use

SRCS = hello.c
OBJS = $(SRCS:.c=$(OBJEXT))

# Build targets

.PHONY: clean

all: $(BIN)

$(OBJS): %$(OBJEXT): %.c
   $(CC) -c $(CFLAGS) -o $@ $<

$(BIN): $(OBJS)
   $(LD) $(LDELFFLAGS) -o $@ $^
   $(STRIP) $@
   #$(CROSSDEV)objdump -f $@

clean:
   rm -f $(BIN)
   rm -f $(OBJS)
The Linker Script
The linker script used in this example is the one from the exported
NuttX package: nuttx-export/scripts/gnu-elf.ld.
Here is an alternative minimal (and possibly outdated) version
SECTIONS
{
.text 0x00000000 :
   {
   _stext = . ;
   *(.text)
   *(.text.*)
   *(.gnu.warning)
   *(.stub)
   *(.glue_7)
   *(.glue_7t)
   *(.jcr)
   _etext = . ;
   }

.rodata :
   {
   _srodata = . ;
   *(.rodata)
   *(.rodata1)
   *(.rodata.*)
   *(.gnu.linkonce.r*)
   _erodata = . ;
   }

.data :
   {
   _sdata = . ;
   *(.data)
   *(.data1)
   *(.data.*)
   *(.gnu.linkonce.d*)
   _edata = . ;
   }

.bss :
   {
   _sbss = . ;
   *(.bss)
   *(.bss.*)
   *(.sbss)
   *(.sbss.*)
   *(.gnu.linkonce.b*)
   *(COMMON)
   _ebss = . ;
   }

   .stab 0 : { *(.stab) }
   .stabstr 0 : { *(.stabstr) }
   .stab.excl 0 : { *(.stab.excl) }
   .stab.exclstr 0 : { *(.stab.exclstr) }
   .stab.index 0 : { *(.stab.index) }
   .stab.indexstr 0 : { *(.stab.indexstr) }
   .comment 0 : { *(.comment) }
   .debug_abbrev 0 : { *(.debug_abbrev) }
   .debug_info 0 : { *(.debug_info) }
   .debug_line 0 : { *(.debug_line) }
   .debug_pubnames 0 : { *(.debug_pubnames) }
   .debug_aranges 0 : { *(.debug_aranges) }
}
Replacing NSH Built-In Functions
Files can be executed by NSH from the command line by simply typing the name of the ELF program, given that the following requirements are met:
The feature is enabled with
CONFIG_NSH_FILE_APP=y.Support for the PATH variable is enabled with
CONFIG_LIBC_ENVPATH=y.The mount point of the file system that may contain ELF programs is set in
CONFIG_PATH_INITIAL.
In this example, there is no application in the base firmware called
hello. So attempts to run hello will fail:
nsh> hello
nsh: hello: command not found
nsh>
But if we mount the SD card containing the hello binary that we created
above, then we can successfully execute the hello command:
nsh> mount -t vfat /dev/mmcsd0 /addons
nsh> ls /addons
/addons:
 hello
nsh> hello
Hello from a partially linked Add-On Program!
nsh>
This showed that you can add a new NSH command to a product without
modifying the base firmware, but you can also replace or update an existing
built-in application: in the above configuration, NSH will first attempt to
run the program called hello from the file system; this will fail because
the custom hello ELF program is not yet available. So instead, NSH will
fallback and execute the built-in application called hello. This way,
any command known to NSH can be replaced from an ELF program installed in a
mounted file system directory specified in the PATH environment variable:
after adding the custom hello binary to the file system, NSH will prefer it
over the built-in version when attempting to run the program called hello.
Tightly Coupled Memories
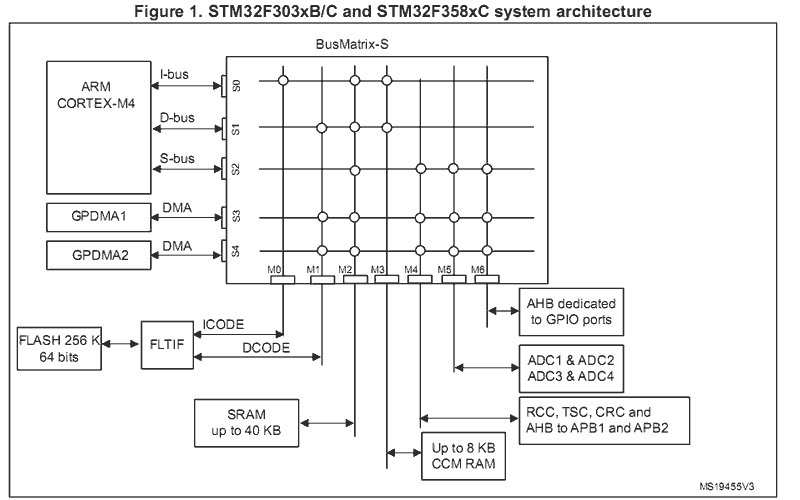
Most MCUs based on ARMv7-M family processors support some kind of Tightly Coupled Memory (TCM). These TCMs have somewhat different properties for specialized operations. Depending on the bus matrix of the processor, you may not be able to execute programs from the TCM. For instance, the STM32F4 supports Core Coupled Memory (CCM) but, since it is tied directly to the D-bus, it cannot be used to execute programs. On the other hand, the STM32F3 has a CCM that is accessible to both the D-Bus and the I-Bus, in which case it should be possible to execute programs directly from this TCM.
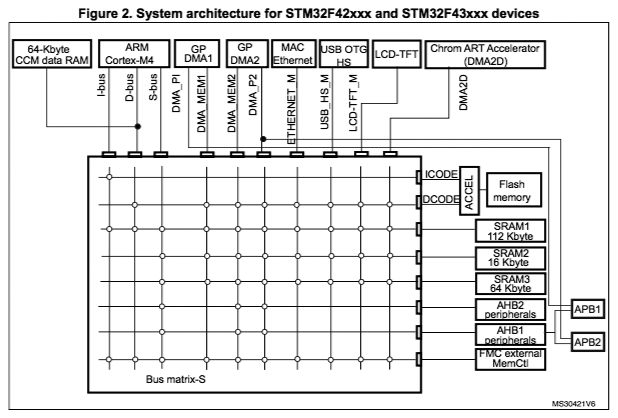
When ELF programs are loaded into memory, such memory is allocated from the
heap via a standard memory allocator. With the STM32F4, the CCM is included
in the heap by default and will typically be allocated first. If CCM memory
is allocated to hold the loaded ELF program, then a hard-fault will occur
immediately when you try to execute it.
Therefore, on STM32F4 platforms it is necessary to include the
CONFIG_STM32_CCMEXCLUDE=y configuration setting. With it, the CCM
memory will be excluded from the heap and will never be allocated for
ELF program memory.