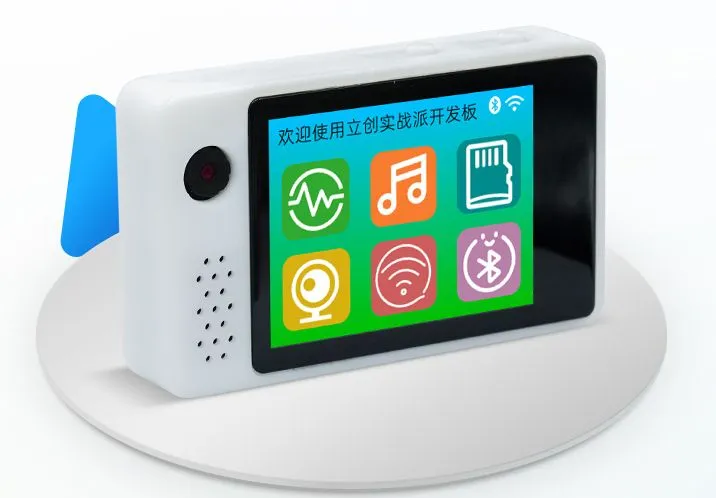
LCKFB SZPI ESP32-S3
The LCKFB SZPI ESP32-S3 is a development board for the ESP32-S3 SoC from Jialichuang, based on a ESP32-S3-WROOM-1 module.
|
Features
The development board almost includes all the achievable functions of the ESP32-S3, maximizing the performance of the ESP32-S3. It features a color screen display (2 inches), complete audio input (2 microphones) and output (speaker) functions. Combined with its integrated motion sensors, as well as Wi-Fi and Bluetooth capabilities, it can be used to create more practical and interesting IoT applications. There are two expansion interfaces available for connecting additional external sensor modules and actuators. The development board is compact in size (69x41x14mm), and the shell is designed without screws, allowing for easy opening and installation by hand without the need for tools such as a screwdriver.
Serial Console
UART0 is, by default, the serial console. It connects to the on-board CP2102 converter and is available on the USB connector USB CON8 (J1).
It will show up as /dev/ttyUSB[n] where [n] will probably be 0.
I2S
ESP32-S3 has two I2S peripherals accessible using either the generic I2S audio driver or a specific audio codec driver (CS4344 bindings are available at the moment). The generic I2S audio driver enables the use of both the receiver module (RX) and the transmitter module (TX) without using any specific codec. Also, it’s possible to use the I2S character device driver to bypass the audio subsystem and write directly to the I2S peripheral.
Configurations
All of the configurations presented below can be tested by running the following commands:
$ ./tools/configure.sh lckfb-szpi-esp32s3:<config_name>
$ make flash ESPTOOL_PORT=/dev/ttyUSB0 -j
Where <config_name> is the name of board configuration you want to use, i.e.: nsh, buttons, wifi…
Then use a serial console terminal like picocom configured to 115200 8N1.
nsh
Basic NuttShell configuration (console enabled in UART0, exposed via USB connection by means of CP2102 converter, at 115200 bps).
usb_device
Basic NuttShell configuration console and USB CDCACM enabled.
You can run the configuration and compilation procedure:
$ ./tools/configure.sh lckfb-szpi-esp32s3:usb_device
$ make -j16
$ make flash ESPTOOL_PORT=/dev/ttyUSBx
And then run the usbserial command at device side:
nsh> usbserial &
Finally check dmesg and content at host side:
$ sudo dmesg -c
[1768234.376415] usb 1-9.3.3: new full-speed USB device number 87 using xhci_hcd
[1768234.468015] usb 1-9.3.3: New USB device found, idVendor=0525, idProduct=a4a7, bcdDevice= 1.01
[1768234.468020] usb 1-9.3.3: New USB device strings: Mfr=1, Product=2, SerialNumber=3
[1768234.468021] usb 1-9.3.3: Product: CDC/ACM Serial
[1768234.468022] usb 1-9.3.3: Manufacturer: NuttX
[1768234.468023] usb 1-9.3.3: SerialNumber: 0
[1768234.478806] cdc_acm 1-9.3.3:1.0: ttyACM5: USB ACM device

$ sudo minicom -D /dev/ttyACM5 -b 115200
adb
Basic NuttShell configuration console enabled over USB Device (USB ADB).
You can run the configuration and compilation procedure:
$ ./tools/configure.sh lckfb-szpi-esp32s3:adb
$ make -j16
$ make flash ESPTOOL_PORT=/dev/ttyUSBx
Then run the adb command:
$ adb -s 1234 shell
nsh> uname -a
NuttX 0.0.0  Mar 21 2025 14:25:36 xtensa lckfb-szpi-esp32s3
es7210
Basic NuttShell configuration with ES7210 4-channel ADC audio codec support over USB ADB. The ES7210 is connected via I2C0 (address 0x41) and I2S0 RX, enabling audio recording through the on-board microphones.
The I2S0 RX pin mapping is as follows:
Signal |
GPIO |
|---|---|
BCLK |
GPIO14 |
DIN |
GPIO12 |
MCLK |
GPIO38 |
WS |
GPIO13 |
You can run the configuration and compilation procedure:
$ ./tools/configure.sh lckfb-szpi-esp32s3:es7210
$ make flash ESPTOOL_PORT=/dev/ttyUSB0 -j
Then record audio using nxrecorder:
$ adb -s 1234 shell
nsh> nxrecorder
nxrecorder> device /dev/audio/pcm_in0
nxrecorder> recordraw /tmp/test.pcm 2 16 48000
nxrecorder> stop
nxrecorder> q
Pull the recorded file to the host and convert to WAV:
$ adb -s 1234 pull /tmp/test.pcm .
$ ffmpeg -f s16le -ar 48000 -ac 2 -i test.pcm test.wav
txtable
Basic TXTABLE(Text based Partition Table) configuration console enabled over USB ADB.
You can run the configuration and compilation procedure:
$ ./tools/configure.sh -l lckfb-szpi-esp32s3:txtable
$ make -j16
$ make flash ESPTOOL_PORT=/dev/ttyUSBx
Then check the partition:
nsh> ls -l /dev/
/dev:
 dr--r--r--           0 adb0/
 crw-rw-rw-           0 console
 frw-rw-rw-     1044480 data
 frw-rw-rw-     1048576 esp32s3flash
 c-w--w--w-           0 log
 crw-rw-rw-           0 null
 crw-rw-rw-           0 ptmx
 dr--r--r--           0 pts/
 brw-rw-rw-        1024 ram0
 crw-rw-rw-           0 ttyS0
 frw-rw-rw-        4096 txtable
 crw-rw-rw-           0 zero
fastboot
You can run the configuration and compilation procedure:
$ ./tools/configure.sh -l lckfb-szpi-esp32s3:fastboot
$ make flash ESPTOOL_PORT=/dev/ttyUSBx -j
To test it, just run the following (Default is host side):
Install fastboot tool:
sudo apt install fastboot
Specify a device / List devices:
List devices only supported for USB transport:
fastboot devices

# Examples

$ fastboot devices
1234    fastboot
To specific a device, use “-s” option:
# Usage
#
#   -s tcp:HOST[:PORT]         Specify a TCP network device.
#   -s SERIAL                  Specify a USB device.

fastboot -s SERIAL COMMAND
fastboot -s tcp:HOST[:PORT] COMMAND

# Examples

$ fastboot -s 1234 oem shell ifconfig
wlan0   Link encap:Ethernet HWaddr a0:85:e3:f4:43:30 at RUNNING mtu 1500
        inet addr:192.168.211.111 DRaddr:192.168.211.107 Mask:255.255.255.0

PS C:\workspace> fastboot.exe -s tcp:192.168.211.111 oem shell ifconfig
wlan0   Link encap:Ethernet HWaddr a0:85:e3:f4:43:30 at RUNNING mtu 1500
        inet addr:192.168.211.111 DRaddr:192.168.211.107 Mask:255.255.255.0
Display given variable:
fastboot getvar <NAME>
Example:
# Display the "kernel" variable::
$ fastboot -s 1234 getvar kernel
Kernel: NuttX
Finished. Total time: 0.000s
Flash given partition:
fastboot flash PARTITION FILENAME
Example (Flash test.img to partition ram10):
# 1. Generate a test image
$ dd if=/dev/random of=test.img bs=1 count=128

# 2. Create a RAM disk (Device side)
nsh> mkrd -m 10 -s 512 640
nsh> ls -l /dev/ram10
 brw-rw-rw-      327680 /dev/ram10

# 3. Flash test.img to partition ram10
$ fastboot flash ram10 ./test.img
Sending 'ram10' (0 KB)                             OKAY [  0.001s]
Writing 'ram10'                                    OKAY [  0.001s]
Finished. Total time: 0.003s

# 4. Hexdump the test.img and partition ram10, and compare

## Host side
$ hexdump test.img
0000000 b1e8 b297 4ac5 9dfa d170 244e 4f83 0f93
0000010 1bf7 0b19 7bde 5543 0520 9719 746d 54fc
0000020 369d 72b3 f2e6 f463 c8e9 24c8 c876 e820
0000030 384d 07ab 52ca 2b24 dee7 0404 2663 91e4
0000040 6752 3611 aece b543 5194 2224 d1d5 8144
0000050 ff44 3bc9 5155 b393 1efb 9e88 2de9 3669
0000060 d010 2770 9192 2532 ccf5 591f 39ea 2431
0000070 2e3f feb0 87ef 9bdf 7dd4 2e79 64de edf6
0000080

## Device side
nsh> hexdump /dev/ram10 count=128
/dev/ram10 at 00000000:
0000: e8 b1 97 b2 c5 4a fa 9d 70 d1 4e 24 83 4f 93 0f .....J..p.N$.O..
0010: f7 1b 19 0b de 7b 43 55 20 05 19 97 6d 74 fc 54 .....{CU ...mt.T
0020: 9d 36 b3 72 e6 f2 63 f4 e9 c8 c8 24 76 c8 20 e8 .6.r..c....$v. .
0030: 4d 38 ab 07 ca 52 24 2b e7 de 04 04 63 26 e4 91 M8...R$+....c&..
0040: 52 67 11 36 ce ae 43 b5 94 51 24 22 d5 d1 44 81 Rg.6..C..Q$"..D.
0050: 44 ff c9 3b 55 51 93 b3 fb 1e 88 9e e9 2d 69 36 D..;UQ.......-i6
0060: 10 d0 70 27 92 91 32 25 f5 cc 1f 59 ea 39 31 24 ..p'..2%...Y.91$
0070: 3f 2e b0 fe ef 87 df 9b d4 7d 79 2e de 64 f6 ed ?........}y..d..
fastboot_usb
You can run the configuration and compilation procedure:
$ ./tools/configure.sh -l lckfb-szpi-esp32s3:fastboot_usb
$ make flash ESPTOOL_PORT=/dev/ttyUSBx -j
fastboot_tcp
You can run the configuration and compilation procedure:
$ ./tools/configure.sh -l lckfb-szpi-esp32s3:fastboot_tcp
$ make flash ESPTOOL_PORT=/dev/ttyUSBx -j
To test it, just run the following:
# Device side

nsh> wapi psk wlan0 mypasswd 3
nsh> wapi essid wlan0 myssid 1
nsh> renew wlan0

# Host side

PS C:\workspace> fastboot.exe -s tcp:HOST[:PORT] oem shell ls
/:
 data/
 dev/
 etc/
 proc/
 var/
OKAY [  0.063s]
Finished. Total time: 0.064s
pca9557
Basic NuttShell configuration console and I/O expander driver PCA9557 enabled.
You can run the configuration and compilation procedure:
$ ./tools/configure.sh lckfb-szpi-esp32s3:pca9557
$ make flash -j$(nproc) ESPTOOL_PORT=/dev/ttyUSB0
Then test gpio2(pin9(P2) of PCA9557):
# With hardware check, the pin levels meet the expected requirements.

# Output low
nsh> echo 0 > /dev/gpio2
nsh> cat /dev/gpio2
0

# Output high
nsh> echo 1 > /dev/gpio2
nsh> cat /dev/gpio2
1
pwm
Basic NuttShell configuration console and LEDC(PWM) enabled.
You can run the configuration and compilation procedure:
$ ./tools/configure.sh lckfb-szpi-esp32s3:pwm
$ make flash -j$(nproc) ESPTOOL_PORT=/dev/ttyUSB0
Then test LEDC(PWM) with pin42(backlight of LCD):
# Backlight 0%
nsh> pwm -d 100
pwm_main: starting output with frequency: 100 duty: 0000ffff
pwm_main: stopping output

# Backlight 10%
nsh> pwm -d 90
pwm_main: starting output with frequency: 100 duty: 0000e666
pwm_main: stopping output

# Backlight 100%
nsh> pwm -d 0
pwm_main: starting output with frequency: 100 duty: 00000000
pwm_main: stopping output
psram
Basic NuttShell configuration console and PSRAM(Pseudo Static Random Access Memory) enabled.
You can run the configuration and compilation procedure:
$ ./tools/configure.sh lckfb-szpi-esp32s3:psram
$ make flash -j$(nproc) ESPTOOL_PORT=/dev/ttyUSB0
Then comparing memory size with the basic “nsh” config:
# lckfb-szpi-esp32s3:nsh
nsh> free
   total       used       free    maxused    maxfree  nused  nfree name
     332948     161500     171448     178280     171448     39      1 Umem

# lckfb-szpi-esp32s3:psram
nsh> free
      total       used       free    maxused    maxfree  nused  nfree name
    8785268     161516    8623752     161888    8388592     41      2 Umem
gpio
Basic NuttShell configuration console and GPIO enabled.
Num |
Type |
Func / Location |
|---|---|---|
IO39 |
Output |
LCD SPI D/C |
IO10 |
Input |
GP1.25-5P expansion interface 1 (left side, near the speaker) |
IO11 |
Interrupt |
GP1.25-5P expansion interface 1 (left side, near the speaker) |
You can run the configuration and compilation procedure:
$ ./tools/configure.sh lckfb-szpi-esp32s3:gpio
$ make flash -j$(nproc) ESPTOOL_PORT=/dev/ttyUSB0
Then test gpio39(IO39):
# With hardware check, the pin levels meet the expected requirements.

# Output high
nsh> echo 1 > /dev/gpio39
nsh> cat /dev/gpio39
1

# Output low
nsh> echo 0 > /dev/gpio39
nsh> cat /dev/gpio39
0
lcd
Basic NuttShell configuration console and LCD enabled.
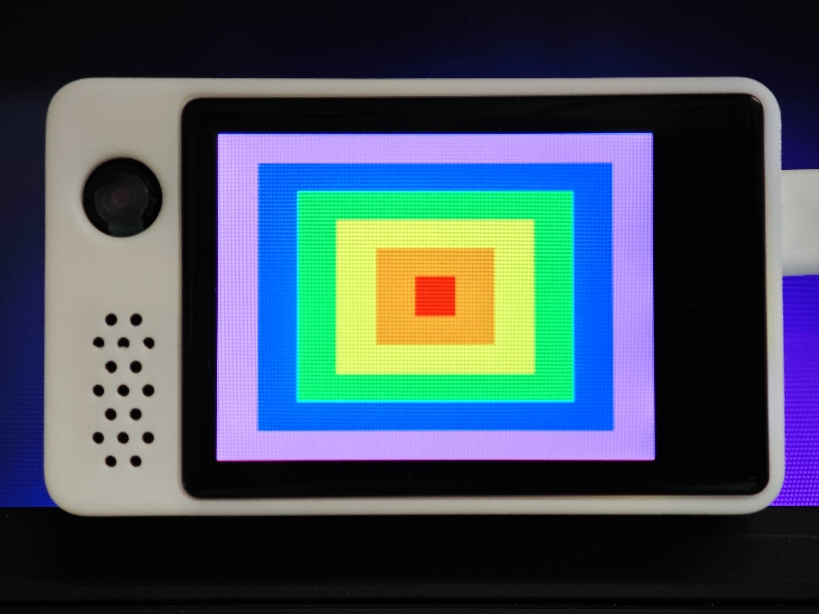
You can run the configuration and compilation procedure:
$ ./tools/configure.sh lckfb-szpi-esp32s3:lcd
$ make flash -j$(nproc) ESPTOOL_PORT=/dev/ttyUSB0
Then run the fb command:
nsh> fb
VideoInfo:
      fmt: 11
     xres: 240
     yres: 320
  nplanes: 1
PlaneInfo (plane 0):
    fbmem: 0x3fc8e9f8
    fblen: 153600
   stride: 480
  display: 0
      bpp: 16
Mapped FB: 0x3fc8e9f8
 0: (  0,  0) (240,320)
 1: ( 21, 29) (198,262)
 2: ( 42, 58) (156,204)
 3: ( 63, 87) (114,146)
 4: ( 84,116) ( 72, 88)
 5: (105,145) ( 30, 30)
Test finished
nsh>
lvgl
Basic NuttShell configuration console and LVGL(Light and Versatile Graphics Library) enabled.

You can run the configuration and compilation procedure:
$ ./tools/configure.sh -l lckfb-szpi-esp32s3:lvgl
$ make flash -j$(nproc) ESPTOOL_PORT=/dev/ttyUSB0
Then run the lvgldemo command:
nsh> lvgldemo
[LVGL] [User]   (6.560, +6560)   check_stack_size: tid: 2, Stack size : 16328 lv_nuttx_entry.c:297
[LVGL] [User]   (6.560, +0)      lv_nuttx_lcd_create: lcd /dev/lcd0 opening lv_nuttx_lcd.c:77
[LVGL] [User]   (6.560, +0)      lv_nuttx_lcd_create: lcd /dev/lcd0 open success lv_nuttx_lcd.c:84
[LVGL] [Warn]   (6.570, +10)     lv_demo_widgets: LV_FONT_MONTSERRAT_18 is not enabled for the widgets demo. Using LV_FONT_DEFAULT instead. lv_demo_widgets.c:156
[LVGL] [Warn]   (6.580, +10)     lv_demo_widgets: LV_FONT_MONTSERRAT_12 is not enabled for the widgets demo. Using LV_FONT_DEFAULT instead. lv_demo_widgets.c:161
qmi8658
Basic NuttShell configuration console and QMI8658 6-axis IMU sensor enabled.
The QMI8658 is a 6-axis IMU sensor that combines a 3-axis accelerometer and 3-axis gyroscope. This configuration enables the sensor on I2C0 at address 0x6A and registers uORB devices:
/dev/uorb/sensor_accel0for accelerometer data/dev/uorb/sensor_gyro0for gyroscope data
You can run the configuration and compilation procedure:
$ ./tools/configure.sh lckfb-szpi-esp32s3:qmi8658
$ make flash -j$(nproc) ESPTOOL_PORT=/dev/ttyUSB0
Then test the IMU sensor:
# Check available sensor devices
nsh> ls /dev/uorb/
/dev/uorb:
 sensor_accel0
 sensor_gyro0

nsh> uorb_listener

Monitor objects num:2
object_name:sensor_gyro, object_instance:0
object_name:sensor_accel, object_instance:0
sensor_gyro(now:113510000):timestamp:113510000,x:1.468750,y:1.562500,z:-0.093750,temperature:22.855469
sensor_accel(now:113510000):timestamp:113510000,x:-0.810913,y:0.027343,z:0.571167,temperature:22.855469
sdmmc
Basic NuttShell configuration console and SD card enabled via SDMMC peripheral in 1-bit mode. The SD card pin mapping is as follows:
Pin |
GPIO |
|---|---|
CLK |
GPIO47 |
CMD |
GPIO48 |
D0 |
GPIO21 |
You can run the configuration and compilation procedure:
$ ./tools/configure.sh lckfb-szpi-esp32s3:sdmmc
$ make flash -j$(nproc) ESPTOOL_PORT=/dev/ttyUSB0
Then format and mount the SD card:
# Format the SD card with FAT32
nsh> mkfatfs -F 32 /dev/mmcsd1

# Create mount point and mount
nsh> mkdir -p /mnt/sd
nsh> mount -t vfat /dev/mmcsd1 /mnt/sd

# Verify
nsh> df
  Block  Number
  Size   Blocks     Used Available Mounted on
     0        0        0         0 /proc
   512 124702720        0 124702720 /mnt/sd

nsh> echo "hello" > /mnt/sd/test.txt
nsh> cat /mnt/sd/test.txt
hello
gc0308
Minimal NuttShell configuration with GC0308 DVP camera support only. Based on the nsh configuration, this adds only the GC0308 image sensor driver, ESP32-S3 CAM DVP controller, and the V4L2 video pipeline. Console is accessible over UART0 (serial).
You can run the configuration and compilation procedure:
$ ./tools/configure.sh lckfb-szpi-esp32s3:gc0308
$ make flash -j$(nproc) ESPTOOL_PORT=/dev/ttyUSB0
camera
Basic NuttShell configuration console and DVP camera enabled via the ESP32-S3 CAM controller with a GC0308 VGA CMOS image sensor. The camera outputs RGB565X (big-endian RGB565) at QVGA (320x240) resolution by default. Console is accessible over USB ADB.
The DVP camera pin mapping is as follows:
Signal |
GPIO |
|---|---|
XCLK |
GPIO15 |
PCLK |
GPIO13 |
VSYNC |
GPIO6 |
HREF |
GPIO7 |
D0 |
GPIO5 |
D1 |
GPIO4 |
D2 |
GPIO16 |
D3 |
GPIO14 |
D4 |
GPIO1 |
D5 |
GPIO2 |
D6 |
GPIO42 |
D7 |
GPIO41 |
PWDN |
GPIO38 (active low, directly connected to PCA9557 I/O expander) |
You can run the configuration and compilation procedure:
$ ./tools/configure.sh lckfb-szpi-esp32s3:camera
$ make flash -j$(nproc) ESPTOOL_PORT=/dev/ttyUSB0
Then use the camera example to capture a frame:
$ adb -s 1234 shell
nsh> camera
uvc
USB Video Class (UVC) webcam configuration. Streams YUYV frames from the GC0308 DVP camera to a USB host via the UVC gadget driver (Bulk transport). The application queries the sensor resolution at runtime and configures the UVC descriptors accordingly. Console is accessible over UART0 (serial).
The UVC driver also supports composite USB device mode
(CONFIG_USBUVC_COMPOSITE), allowing it to be combined with other USB
class drivers (e.g., CDC/ACM) in a single composite device.
You can run the configuration and compilation procedure:
$ ./tools/configure.sh lckfb-szpi-esp32s3:uvc
$ make flash -j$(nproc) ESPTOOL_PORT=/dev/ttyUSB0
The application should work as follows:
Create
/dev/video0viacapture_initialize()and open it.Query the sensor’s native resolution with
VIDIOC_ENUM_FRAMESIZES(pixel formatV4L2_PIX_FMT_YUYV), thenVIDIOC_S_FMTto configure.Fill
struct uvc_params_swith the queried width, height and fps, pass it toboardctl(BOARDIOC_USBDEV_CONTROL)viactrl.handleso the UVC gadget builds USB descriptors matching the actual sensor.Open
/dev/uvc0, usepoll()withPOLLOUTto wait for the USB host to start streaming.Loop:
VIDIOC_QBUF/VIDIOC_DQBUFto capture a YUYV frame, thenwrite()to/dev/uvc0.
On the host side, verify the device is recognized:
$ sudo dmesg
[32982831.662622] usb 1-9.3.3: new full-speed USB device number 72 using xhci_hcd
[32982831.752856] usb 1-9.3.3: New USB device found, idVendor=1d6b, idProduct=0102, bcdDevice= 1.00
[32982831.752860] usb 1-9.3.3: New USB device strings: Mfr=1, Product=2, SerialNumber=3
[32982831.752861] usb 1-9.3.3: Product: NuttX UVC Camera
[32982831.752862] usb 1-9.3.3: Manufacturer: NuttX
[32982831.752863] usb 1-9.3.3: SerialNumber: 0001
[32982831.756625] usb 1-9.3.3: Found UVC 1.10 device NuttX UVC Camera (1d6b:0102)
Then open the webcam with any UVC viewer (e.g. cheese, guvcview,
or ffplay):
$ cheese