ESP32-S3-EYE
The ESP32-S3-EYE is a small-sized AI development board from Espressif featuring the ESP32-S3 CPU with a 2-Megapixel camera, an LCD display, a microphone, an 8 MB Octal PSRAM and an 8 MB flash.
|
Features
ESP32-S3 WROOM-1 Module
USB micro USB port (it uses internal USB JTAG SERIAL device for flashing)
Power LED
LCD Display
2-MP Camera
MEMS Microphone
8MB Octal PSRAM
8MB SPI Flash
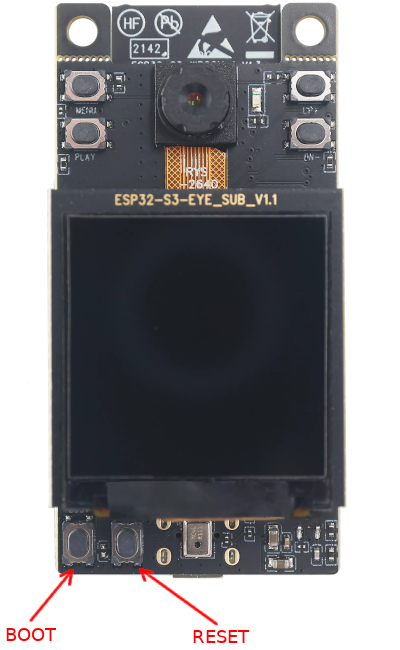
RST and BOOT buttons (BOOT accessible to user)
Configurations
All of the configurations presented below can be tested by running the following commands:
$ ./tools/configure.sh esp32s3-eye:<config_name>
$ make flash ESPTOOL_PORT=/dev/ttyUSB0 -j
Where <config_name> is the name of board configuration you want to use, i.e.: nsh, buttons, wifi…
Then use a serial console terminal like picocom configured to 115200 8N1.
nsh
Basic NuttShell configuration (console enabled in USB JTAG SERIAL Device, exposed via USB connection at 9600 bps).
usbnsh
Basic NuttShell configuration console enabled over USB Device (USB CDC/ACM).
Before using this configuration, please confirm that your computer detected that USB JTAG/serial interface used to flash the board:
usb 3-5.2.3: New USB device strings: Mfr=1, Product=2, SerialNumber=3
usb 3-5.2.3: Product: USB JTAG/serial debug unit
usb 3-5.2.3: Manufacturer: Espressif
usb 3-5.2.3: SerialNumber: XX:XX:XX:XX:XX:XX
cdc_acm 3-5.2.3:1.0: ttyACM0: USB ACM device
Then you can run the configuration and compilation procedure:
$ ./tools/configure.sh esp32s3-eye:usbnsh
$ make flash ESPTOOL_PORT=/dev/ttyACM0 -j8
Then run the minicom configured to /dev/ttyACM0 115200 8n1 and press <ENTER> three times to force the nsh to show up:
NuttShell (NSH) NuttX-12.1.0
nsh> ?
help usage:  help [-v] [<cmd>]

    .         break     dd        exit      ls        ps        source    umount
    [         cat       df        false     mkdir     pwd       test      unset
    ?         cd        dmesg     free      mkrd      rm        time      uptime
    alias     cp        echo      help      mount     rmdir     true      usleep
    unalias   cmp       env       hexdump   mv        set       truncate  xd
    basename  dirname   exec      kill      printf    sleep     uname

Builtin Apps:
    nsh  sh
nsh> uname -a
NuttX 12.1.0 38a73cd970 Jun 18 2023 16:58:46 xtensa esp32s3-eye
nsh>
Flashing
Because ESP32-S3 doesn’t use an external USB/Serial chip like others ESP32 boards you should put it in programming mode this way:
Press and hold BOOT and RESET (RST) buttons at same time;
Release the RESET button and keep BOOT button pressed;
After one or more seconds release the BOOT button;
Run the flashing command: make flash ESPTOOL_PORT=/dev/ttyACM0
Serial Console
The internal USB JTAG SERIAL Device, by default, is used as serial console. It is normally detected by Linux host as a USB CDC/ACM serial device.
It will show up as /dev/ttyACM[n] where [n] will probably be 0.
You can use minicom with /dev/ttyACM0 port at 9600 8n1 or picocom this way:
$ picocom -b9600 /dev/ttyACM0
Pin Mapping
Todo
To be updated
Pin |
Signal |
Notes |
|---|---|---|
? |
? |
? |